Automate every process and workflow
Up to this point, you’ve managed to create a complete business application. The last piece and could be the most important one is implementing the actual business logic of your business.
By business logic, we mean how the system should react to different records and how it should automate tasks based on events to help run your business seamlessly. You can build all your business logic using Beezr Flow.
Beezr Flow
Beezr Flow is a graphical interface that enables the developer to design the logic of the application in the form of a flow chart. It is designed to be simple, comprehensive, and flexible to fulfill the business requirement logic.
Beezr Flow is designed after studying the top BPM (Business Process Management) engines in the market; the problem with a standard BPMN is the complexity of the configuration. Even though that complexity offers complete flexibility to the developers but statistically most of those features are not used by a lot of applications.
Rather than adopting an already available BPM; we decided to build our own engine from the ground up to be as simple and productive as we can. At the end of the day, Beezr is a platform with the intention to give power to the user and cut down development time significantly, and logic implementation is the biggest time consumer in any application development cycle.
To start using Flow, go to the “Workflow” item in the side navigation menu to open the “Flows Builder” page. You should see something like this:

To start creating a new Flow, click on the “New Workflow” button on the top right side of the page.
Once you complete the definition, click “Save”. The flow will be available in the process list on the “Flows Builder” page. To start designing the process, click on the “Design” icon at the end of the record.

Designing your process
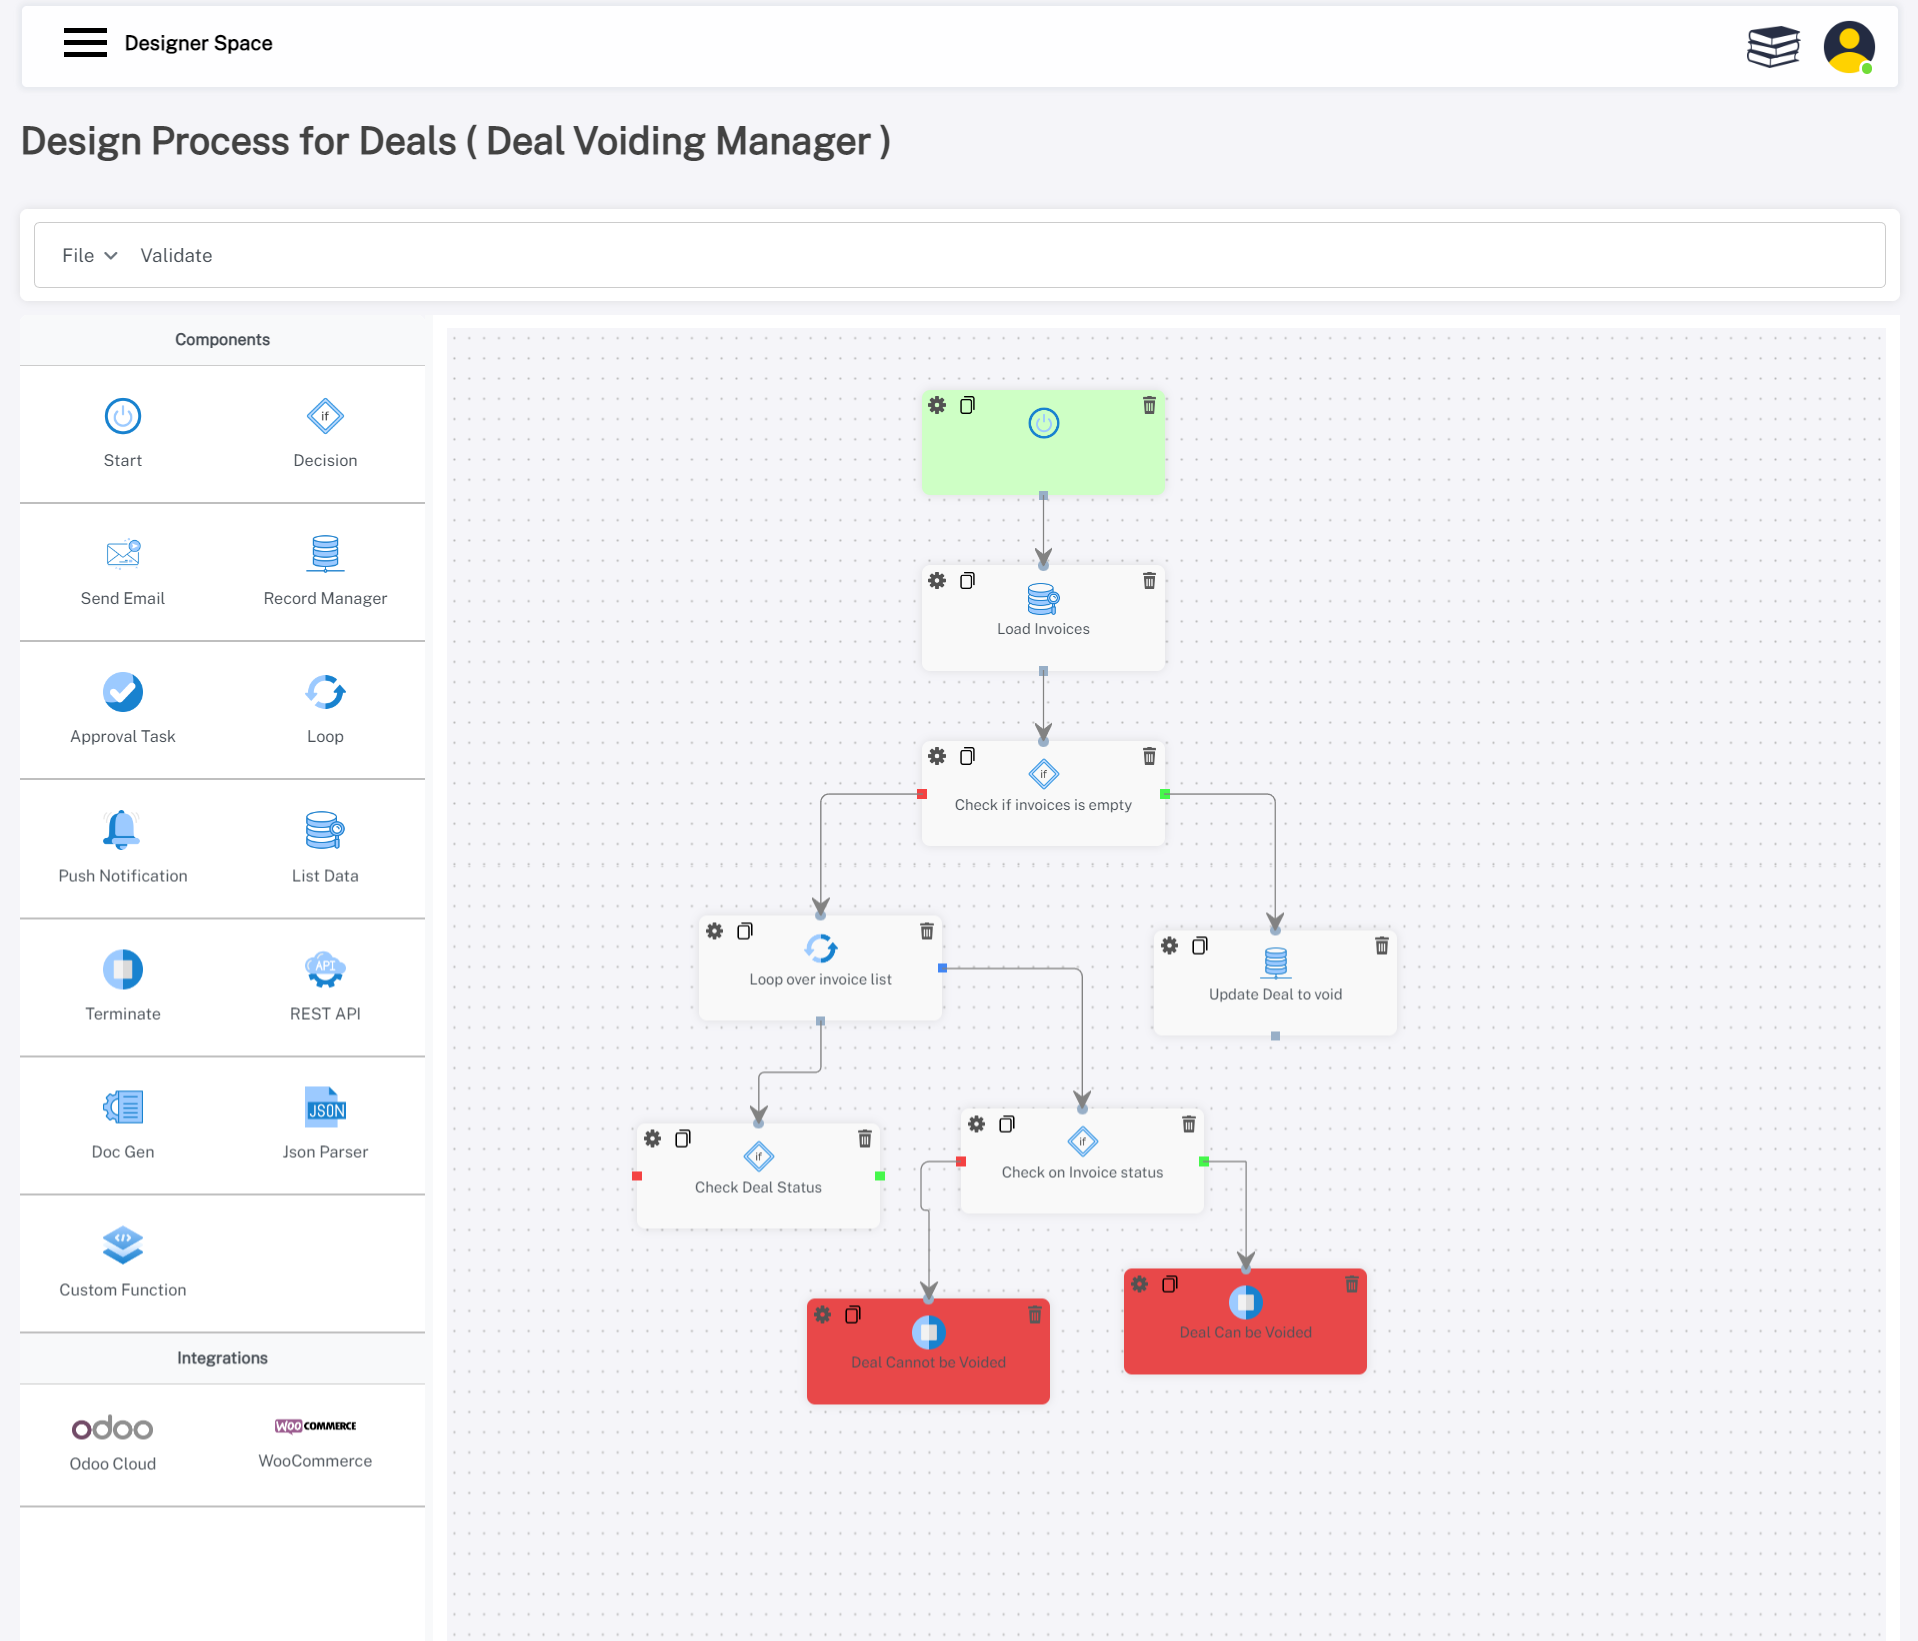
1. Start
Always start your design by dragging a “Start” component into the design workspace. This informs the engine that this is the starting flow of the logic. There can only be one single start component in a flow. You don't need to configure it starting from this version.

2. Decision
This is your if/else conditional step. The Decision component allows you to add conditions on the pipeline variables in order to specify the next step in the process. The decision can only have one of two logical outcomes; either true, meaning all conditions have been met, or false, meaning that either one or more conditions have failed to succeed.
Drag and drop a decision component into the workspace; then click on the settings icon to start configuring it. This is what the configuration looks like:

3. Send Mail
In some of your processes, you will be required to send an email notification to another entity; this entity could be a customer, supplier, or whatever your business requires. The “Send Mail” component gives you the flexibility to send mail notifications with dynamic content.
Drag and drop a “Send Mail” component into the workspace; then click on the settings icon to start configuring it. This is what the configuration looks like:
4. Record Manager
Automation in its core is the capability to allow the system to manipulate your data records without human intervention. That is what the “Record Manager” component allows you to do.
You can create, update or delete records from other Modules to fulfill an automated lifecycle of a record.
Drag and drop a “Record Manager” component into the workspace; then click on the settings icon to start configuring it. This is what the configuration looks like:
Best Practice Notice:
Allows you to iterate over the values or records in a list and rerun the logic inside it.

The loop component has two outcome points:

7. Push Notification
The Beezr App has its own push notification driver. This allows the system to show notifications to the users for events that need their attention. This can be used side by side with a mail notification or a standalone notification mechanism.
The “Push Notification” component allows you to have control over this driver to send this kind of notification to the users.
Drag and drop a “Push Notification” component into the workspace; then click on the settings icon to start configuring it. This is what the configuration looks like:

8. List Data
When the logic you need to implement in your Flow needs to process data beyond the pipeline variables; you can access these items through the List Data component. List Data allows you to load a selective set of items into the pipeline for processing.
Drag and drop a “List Data” component into the workspace; then click on the settings icon to start configuring it. This is what the configuration looks like:

9. Terminate
This component allows you to add a termination message at the end of the logic. This is especially helpful when you are creating a Flow that is meant to be executed with the run type “Pre-Activity”.
This kind of Flows can be used as a custom validation step in the request, which when fails you need to show a descriptive message to the user for the reason for failure. The terminate component allows you to configure this custom message.
Drag and drop a “Terminate” component into the workspace; then click on the settings icon to start configuring it. This is what the configuration looks like:

10. JSON Parser
When creating a webhook-type workflow, you'd expect a JSON request payload to be sent to your workflow. The first step you need to do is parse that request to be able to work on it.
To configure the parser, drag a "JSON Parser" into the workspace. Click on the settings icon to open the configuration.
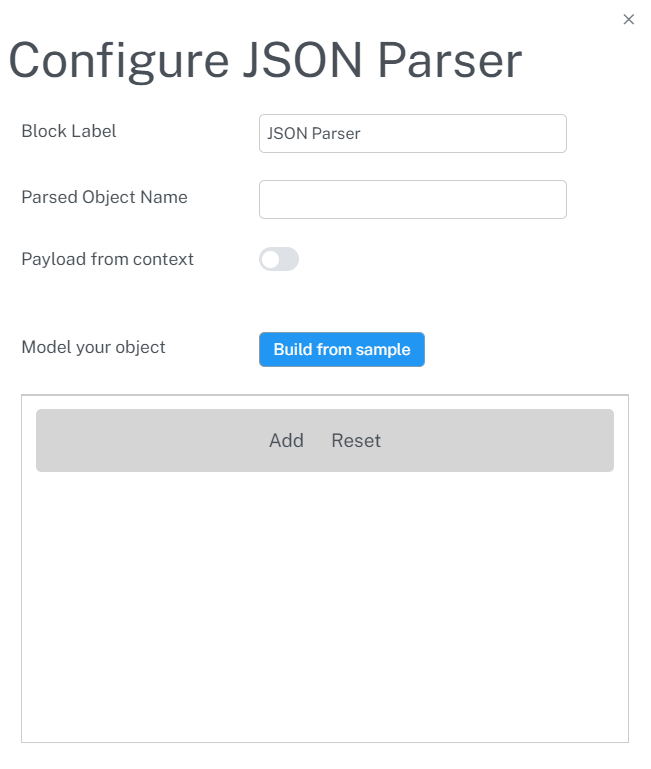
To make your configuration easier and faster, you can build the model from a sample of the payload. Click on "Build from sample" then paste the JSON sample and click "Submit".
Beezr will parse and build the model for you. You can add or remove items in the model as you see fit.
This model can be accessed in the workflow using Beezl, which makes building and manipulating data from other systems quite simple and straightforward.
This step will be used when you are trying to integrate with e-commerce platforms like Shopify or WooCommerce.
11. Doc Gen
You can manipulate and build complex logic for generating a business document. You have to add a template first using the "Templates Manager".
Drop a "Doc Gen" step into the workspace and click the settings icon to open the configuration.
You can use Beezl to dynamically fill the dynamic placeholders.
12. REST API
Integrate Beezr with external systems using restful APIs. Drag a "REST API" step into the workspace and click the gear icon to open the configuration.
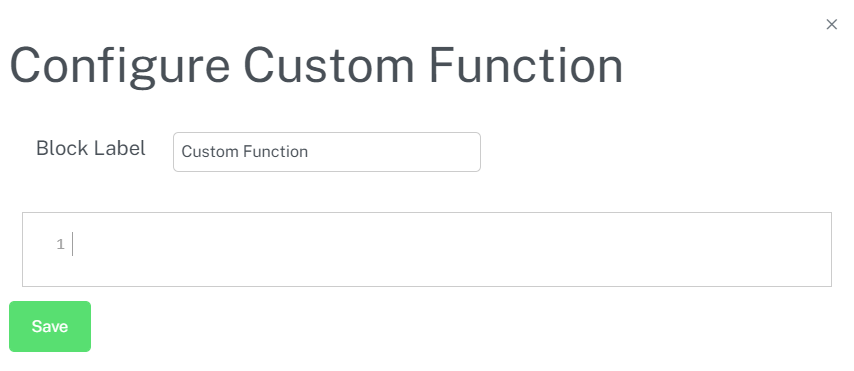
13. Custom Function
To give you more flexibility and freedom to innovate, you can use the "Custom Function" step to building completely custom functions using Beezl.
Up to this point, you’ve managed to create a complete business application. The last piece and could be the most important one is implementing the actual business logic of your business.
By business logic, we mean how the system should react to different records and how it should automate tasks based on events to help run your business seamlessly. You can build all your business logic using Beezr Flow.
Beezr Flow
Beezr Flow is a graphical interface that enables the developer to design the logic of the application in the form of a flow chart. It is designed to be simple, comprehensive, and flexible to fulfill the business requirement logic.
Beezr Flow is designed after studying the top BPM (Business Process Management) engines in the market; the problem with a standard BPMN is the complexity of the configuration. Even though that complexity offers complete flexibility to the developers but statistically most of those features are not used by a lot of applications.
Rather than adopting an already available BPM; we decided to build our own engine from the ground up to be as simple and productive as we can. At the end of the day, Beezr is a platform with the intention to give power to the user and cut down development time significantly, and logic implementation is the biggest time consumer in any application development cycle.
To start using Flow, go to the “Workflow” item in the side navigation menu to open the “Flows Builder” page. You should see something like this:
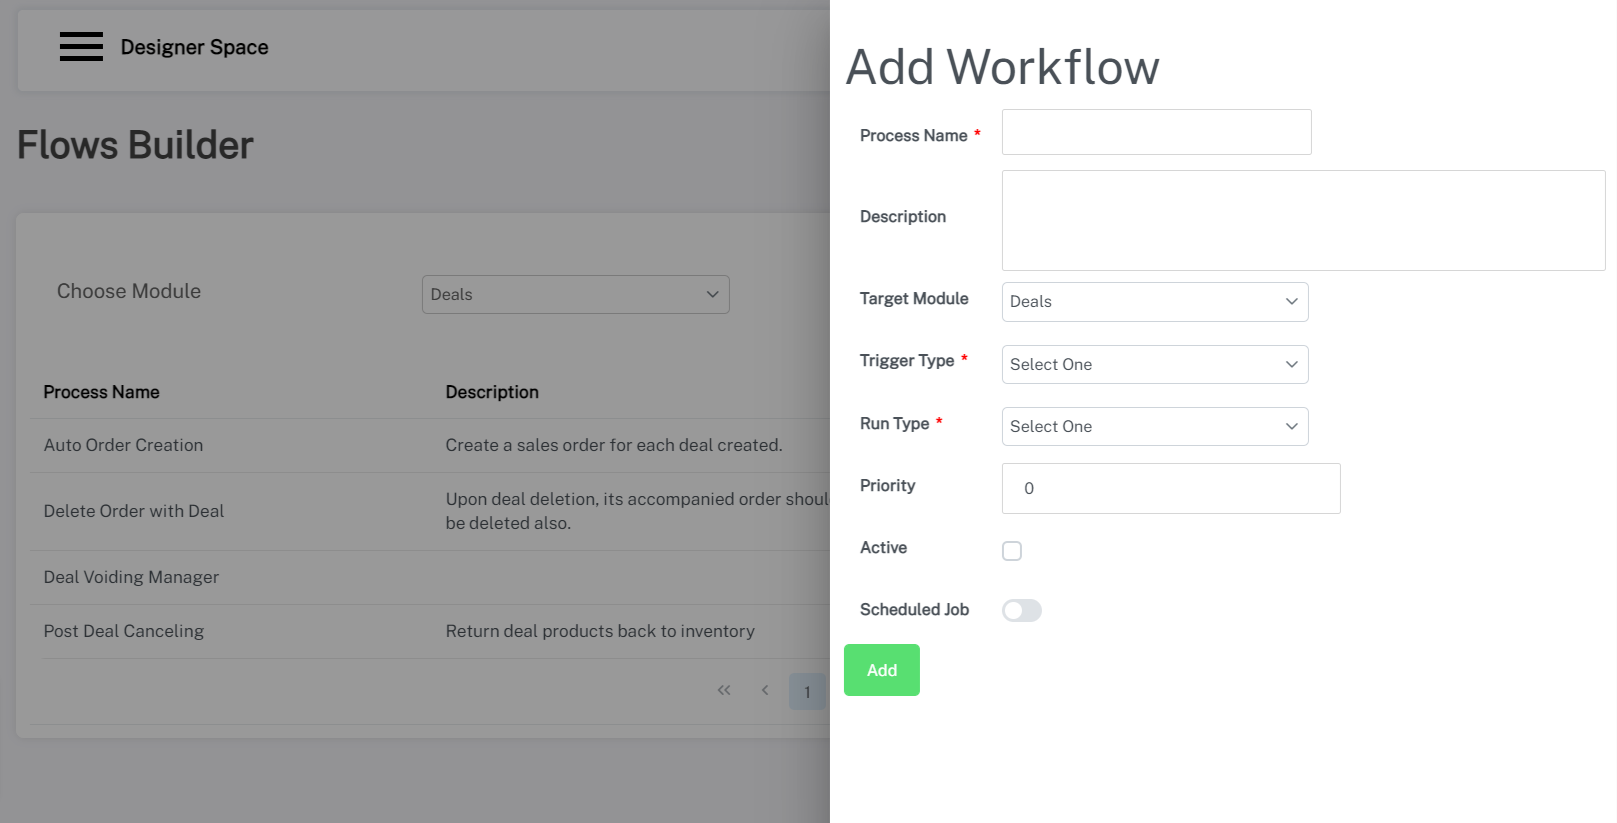
To start creating a new Flow, click on the “New Workflow” button on the top right side of the page.
| Field Name | Field Type | Description |
| Process Name | Text | Give a descriptive name to your process. |
| Description | Text | Provide a short explanation of the intended business behind this Flow. |
| Target Module | Dropdown | A process should be tied to a Module. This informs the platform that the Flow engine will listen on the specified Module with this process in the list of possible actions. |
| Trigger Type | Dropdown | The list of events that could happen on a Module. This informs the platform that the Flow should run when this event occurs.
|
| Run Type | Dropdown | Specify when the Flow should run, post, or pre-the actual event.
|
| Priority | Integer | It is important to specify the priority of the process. This allows the platform to understand which Flow should run before the other if you have multiple Flows configured to run on the same Module event. The sequence of processes is important in delivering the intended business logic. |
| Active | Checkbox | Allows you to enable and disable Flows. Always keep the Flow disabled until you finish the design process. |
| Scheduled | Create a scheduled job that runs every specific period, this takes a cron expression. check this tool Cron Maker |
Once you complete the definition, click “Save”. The flow will be available in the process list on the “Flows Builder” page. To start designing the process, click on the “Design” icon at the end of the record.
Designing your process
1. Start
Always start your design by dragging a “Start” component into the design workspace. This informs the engine that this is the starting flow of the logic. There can only be one single start component in a flow. You don't need to configure it starting from this version.
2. Decision
This is your if/else conditional step. The Decision component allows you to add conditions on the pipeline variables in order to specify the next step in the process. The decision can only have one of two logical outcomes; either true, meaning all conditions have been met, or false, meaning that either one or more conditions have failed to succeed.
Drag and drop a decision component into the workspace; then click on the settings icon to start configuring it. This is what the configuration looks like:
| Field Name | Field Type | Description |
| Block Label | Text | Give a descriptive name to your step. |
| Decision Criteria | Configuration | You can add “AND” based conditions and/or “OR” based conditions |
| Condition Criteria Fields | ||
| Free Form | Checkbox | When the checkbox in the beginning of the criteria is checked; this allows you to add the Module & Fields in free form. This is useful when you are using a “List” component and want to add a decision step on the fields in the list. The reason behind that is that the list could not be loaded in the available Module dropdown. |
| Modules | Dropdown | List of Available Modules |
| Fields | Dropdown | Populated based on the selected Module. |
| Operator | Dropdown | Operator type. |
| Value | Text | This is the value you want to check on. You can add a Beezl Script here if you need to fetch the value from the pipeline itself in a dynamic manner. Note: if you select a field with the “Lookup” type; the value field is automatically updated to a dropdown with the available values for you to select. |
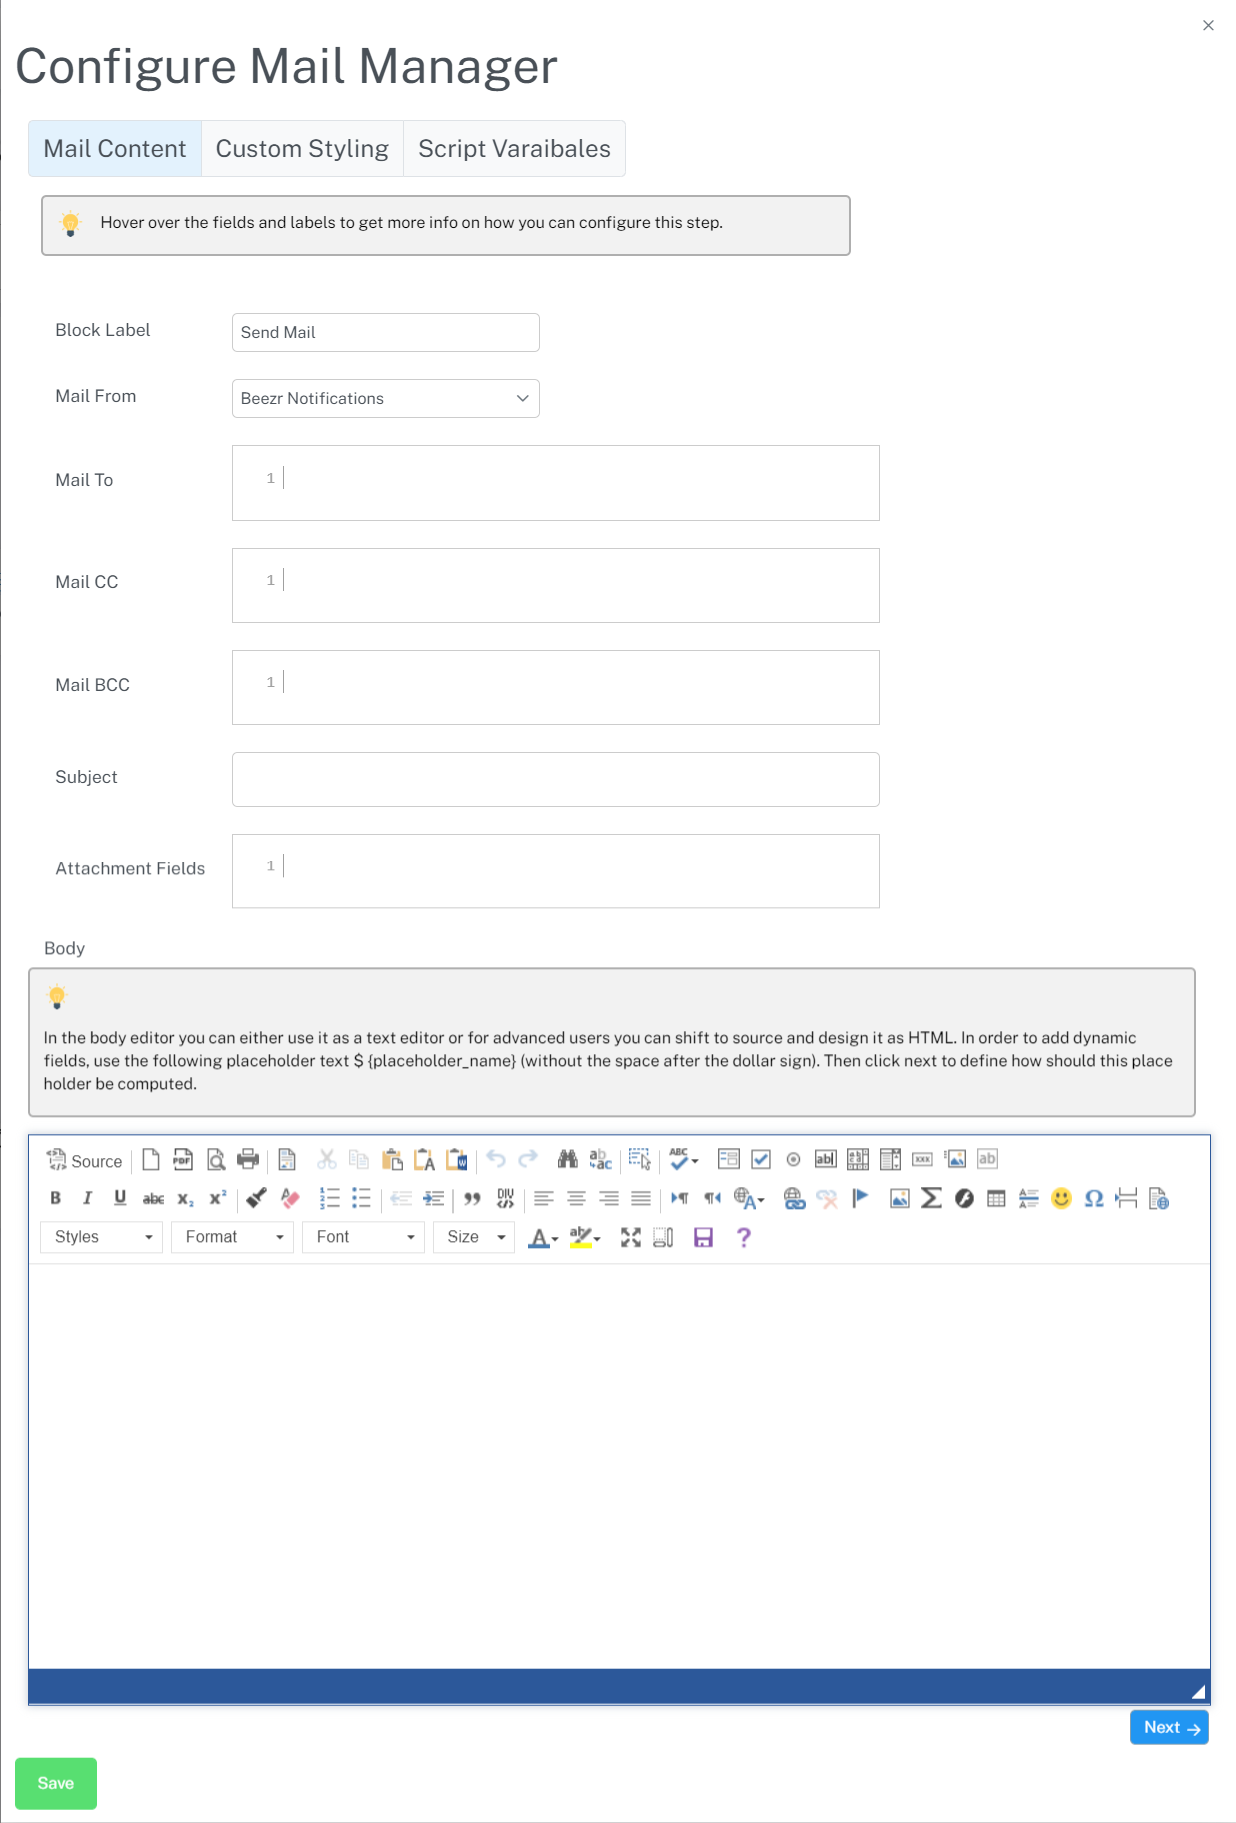
3. Send Mail
In some of your processes, you will be required to send an email notification to another entity; this entity could be a customer, supplier, or whatever your business requires. The “Send Mail” component gives you the flexibility to send mail notifications with dynamic content.
Drag and drop a “Send Mail” component into the workspace; then click on the settings icon to start configuring it. This is what the configuration looks like:
| Field Name | Field Type | Description |
| Block Label | Text | Give a descriptive name to your step. |
| Mail From | Dropdown | If you configured your company emails in Beezr; you can choose which email this mail should be from. For example; you could have support@abc.com or sales@abc.com/ so based on the business you can choose which email is best used. |
| Recipient Configuration (Mail to, Mail CC, Mail BCC) | ||
| Text | The first field in the configuration is an optional text field where you can add the recipient email either through a hard-coded email or using Beezl to fetch it dynamically from one of the Module Fields. | |
| Module | Dropdown | Another method is to leave the Email field empty and choose the Module and Field you want to extract the email. |
| Field | Dropdown | Populated when the Module is selected. |
| Content Configuration | ||
| Subject | Text | Email Subject. |
| Body | Rich Text | A rich text component where you can add whatever content you need to send to your recipient. The content can be:
|
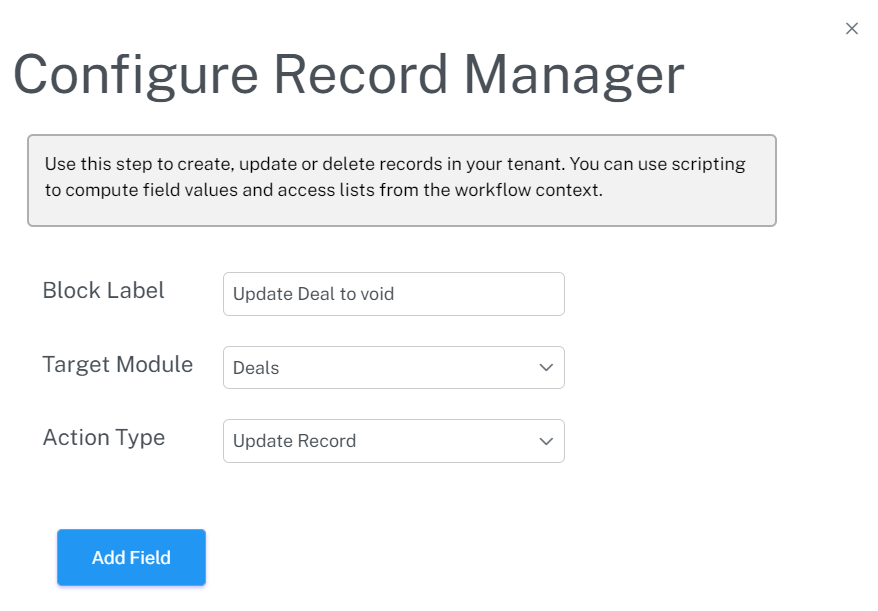
4. Record Manager
Automation in its core is the capability to allow the system to manipulate your data records without human intervention. That is what the “Record Manager” component allows you to do.
You can create, update or delete records from other Modules to fulfill an automated lifecycle of a record.
Drag and drop a “Record Manager” component into the workspace; then click on the settings icon to start configuring it. This is what the configuration looks like:
| Field Name | Field Type | Description |
| Block Label | Text | Give a descriptive name to your step. |
| Action Type | Dropdown | Choose the action you want to do:
|
| Target Module | Dropdown | Choose the Module you want to take the action on. Once you choose the Module, a new section is made available to configure the Fields. |
| Fields Configuration | ||
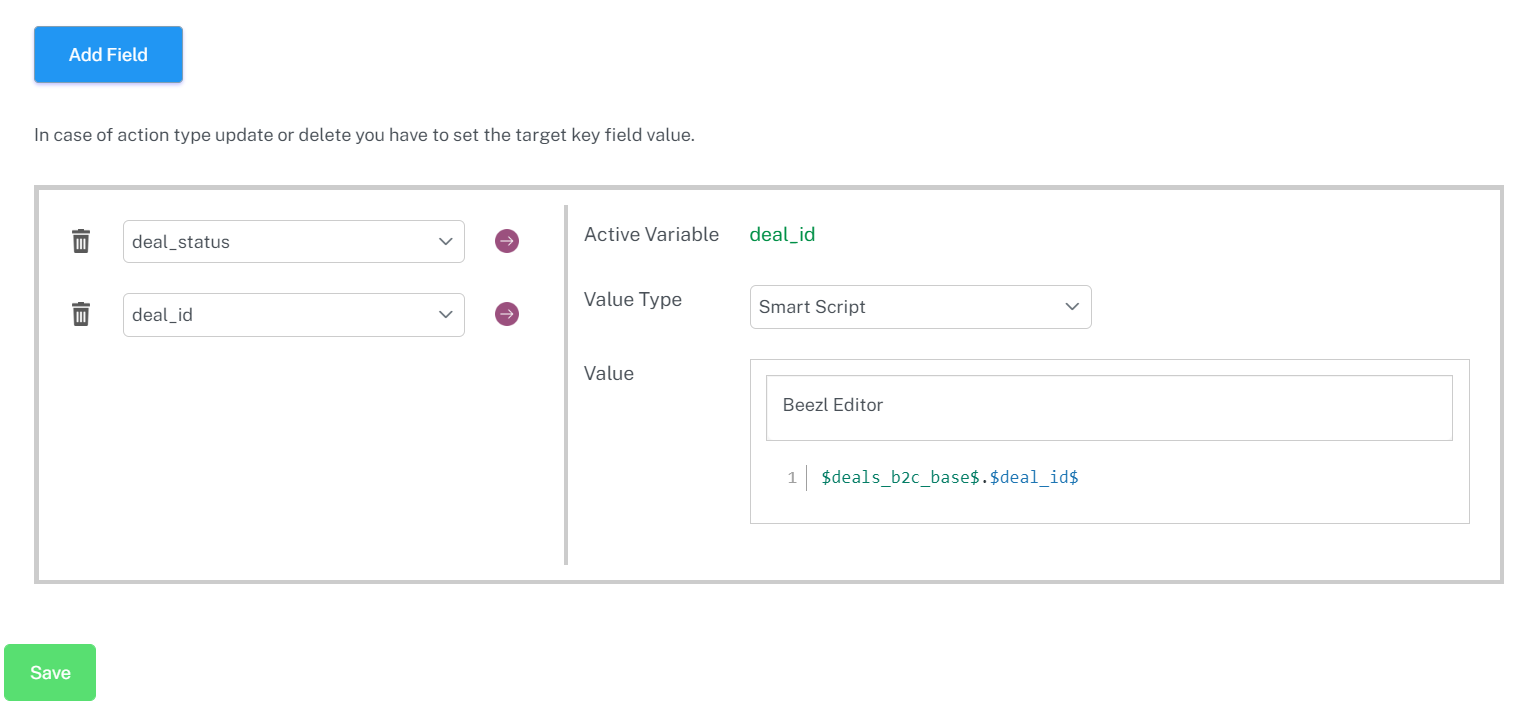 |
||
| Add Field | Button | When this button is clicked, a new field is added from the target Module. Consider this as adding the fields you want to update or add data to while creating. |
| Field | Dropdown | When a field is added, it is shown in the left pane as a dropdown to choose which field you want to work on. |
| Active Variable | Label | When you want to work on one of the fields, click on the arrow button beside the field’s dropdown. It will be active in the configuration pane on the right and its name will appear in the Active Variable label. |
| Value Type | Dropdown | When setting the value of a field, you have one of two ways you can do that; either choose “Default”, which gives you a field type similar to the original type, for example, a lookup field will be a dropdown with the lookup values. The other way is through Beezl Smart Script. |
Best Practice Notice:
- When using the record manager to update the record in the target module of the Flow itself, all you need to do is add the fields you want to update the values of.
- When updating a record different than that of the target module, you have to add the key field as part of the fields in the record manager step. This way the engine understands which record exactly you want to update.
5. Approval Task
Not all processes can be fully automated; in any establishment, there are some processes that need a manager's approval before moving forward.
That’s why we added the approval task, this component allows you to add a human-centric task in the middle of your workflow, and based on the outcome of that task; the flow will move forward. A small example can be seen below:

This is a flow that requires the office manager to approve an employee vacation request, based on the admin choice, the flow is routed to either update the request with acceptance or rejection.
As you see, the allows you to add an asynchronous step in your flow that will pause the execution of the Flow until a human action is taken to move forward.
Drag and drop an “Approval Task” component into the workspace; then click on the settings icon to start configuring it. This is what the configuration looks like:

6. LoopNot all processes can be fully automated; in any establishment, there are some processes that need a manager's approval before moving forward.
That’s why we added the approval task, this component allows you to add a human-centric task in the middle of your workflow, and based on the outcome of that task; the flow will move forward. A small example can be seen below:
This is a flow that requires the office manager to approve an employee vacation request, based on the admin choice, the flow is routed to either update the request with acceptance or rejection.
As you see, the allows you to add an asynchronous step in your flow that will pause the execution of the Flow until a human action is taken to move forward.
Drag and drop an “Approval Task” component into the workspace; then click on the settings icon to start configuring it. This is what the configuration looks like:
| Field Name | Field Type | Description |
| Block Label | Text | Give a descriptive name to your step. |
| Task Title | Text | The title of the task. |
| Task Type | Dropdown | This can be either approval or a delegation task. |
| Task Description | Text | Provide the details on what you need from the user to do to fulfill this task. |
| Priority | Dropdown | The priority of the Task. |
| Status | Dropdown | The initial status the task is going to be created with. The default value is “Not Started” |
| Due Date | Date | The SLA on the task from the target user in order to track backlogged requests and congestion points. |
| Category | Text | Tag your task for easier grouping. |
| Member type | Radio | You can target this task to a specific user. The other way is that you can send the task to a Role. If the role has multiple users in it, then they will all be notified and one of them will need to claim the task as his/her own. |
| Request from Context | Boolean | This ties the request in the context of the Flow with the task so the target approver can view it. If you don’t want this request, then you can disable it and custom configures the request from the pipeline module and the key value using Beezl. |
Allows you to iterate over the values or records in a list and rerun the logic inside it.
The loop component has two outcome points:
- The Blue one on the right side; is the context or body of the loop. This means that all the logic connected from this point onwards will be iterated on with each item in the list.
- The Grey one on the bottom; is considered as logic beyond the loop context. This means that once the loop is done with all of its iterations, the next step will be the logic connected to this point.
| Field Name | Field Type | Description |
| Block Label | Text | Give a descriptive name to your step. |
| Target Module | Dropdown | Loop over records from a certain module. |
| Target List Name | Text | You can skip the target module and add a custom list name from a “List” component in the flow, this will be discussed next. |
7. Push Notification
The Beezr App has its own push notification driver. This allows the system to show notifications to the users for events that need their attention. This can be used side by side with a mail notification or a standalone notification mechanism.
The “Push Notification” component allows you to have control over this driver to send this kind of notification to the users.
Drag and drop a “Push Notification” component into the workspace; then click on the settings icon to start configuring it. This is what the configuration looks like:
| Field Name | Field Type | Description |
| Block Label | Text | Give a descriptive name to your step. |
| Target Module | Dropdown | The module which this notification is concerned with. |
| Title | Text | The title of the notification is to be shown to the user. |
| Description | Text | A short description of what this notification is for. |
| Target Record | Smart Script | Use Beezl to set the key value of the record you want the user to be redirected to. The value should be attained from one of the pipeline variables in the Flow. |
| Target User | Smart Script | Use Beezl to get the target user you want this notification to go to. |
8. List Data
When the logic you need to implement in your Flow needs to process data beyond the pipeline variables; you can access these items through the List Data component. List Data allows you to load a selective set of items into the pipeline for processing.
Drag and drop a “List Data” component into the workspace; then click on the settings icon to start configuring it. This is what the configuration looks like:
| Field Name | Field Type | Description |
| Block Label | Text | Give a descriptive name to your step. |
| Target Module | Dropdown | The module you want to access. |
| List Name | Text | Give the list a name so you can access it later on, you can access the items in the list through a Loop component. |
| Selection Condition | Smart Script | Add the condition you want to filter the items/records within the list variable. |
9. Terminate
This component allows you to add a termination message at the end of the logic. This is especially helpful when you are creating a Flow that is meant to be executed with the run type “Pre-Activity”.
This kind of Flows can be used as a custom validation step in the request, which when fails you need to show a descriptive message to the user for the reason for failure. The terminate component allows you to configure this custom message.
Drag and drop a “Terminate” component into the workspace; then click on the settings icon to start configuring it. This is what the configuration looks like:
| Field Name | Field Type | Description |
| Block Label | Text | Give a descriptive name to your step. |
| Error Code | Boolean | Type of termination, error, or success. |
| Error Message | Text | Provide a descriptive error message to the user on why the request failed to be processed. |
10. JSON Parser
When creating a webhook-type workflow, you'd expect a JSON request payload to be sent to your workflow. The first step you need to do is parse that request to be able to work on it.
To configure the parser, drag a "JSON Parser" into the workspace. Click on the settings icon to open the configuration.
To make your configuration easier and faster, you can build the model from a sample of the payload. Click on "Build from sample" then paste the JSON sample and click "Submit".
Beezr will parse and build the model for you. You can add or remove items in the model as you see fit.
This model can be accessed in the workflow using Beezl, which makes building and manipulating data from other systems quite simple and straightforward.
This step will be used when you are trying to integrate with e-commerce platforms like Shopify or WooCommerce.
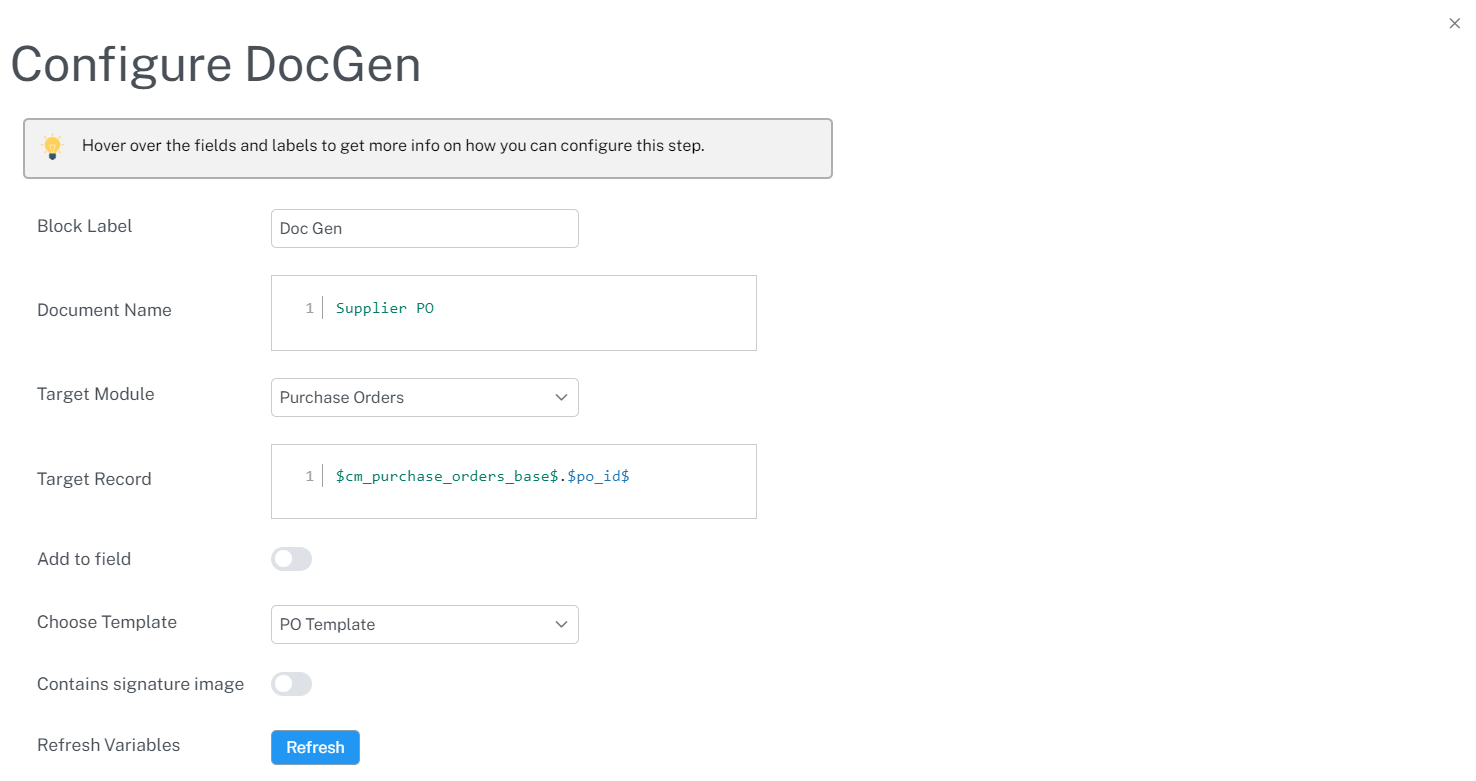
11. Doc Gen
You can manipulate and build complex logic for generating a business document. You have to add a template first using the "Templates Manager".
Drop a "Doc Gen" step into the workspace and click the settings icon to open the configuration.
- Document Name: Give your generated document a name. You can use Beezl to generate a dynamic name.
- Target Module: Which module does this document belong to?
- Target Record: Generated documents are added as attachments to records. Refer to the key field of the record to which you want this document to be attached.
- Choose Template: Choose one of the templates available from the templates manager.
- Contain Signature: You can capture e-signatures in forms and add them to the document itself. This feature is only supported for Microsoft word templates.
- Add a bookmark in your docx template and give it a unique name without spaces.
- Add the bookmark name in the "Signature Bookmark" field.
- Add the field name that holds the signature in the "Signature Field" field.
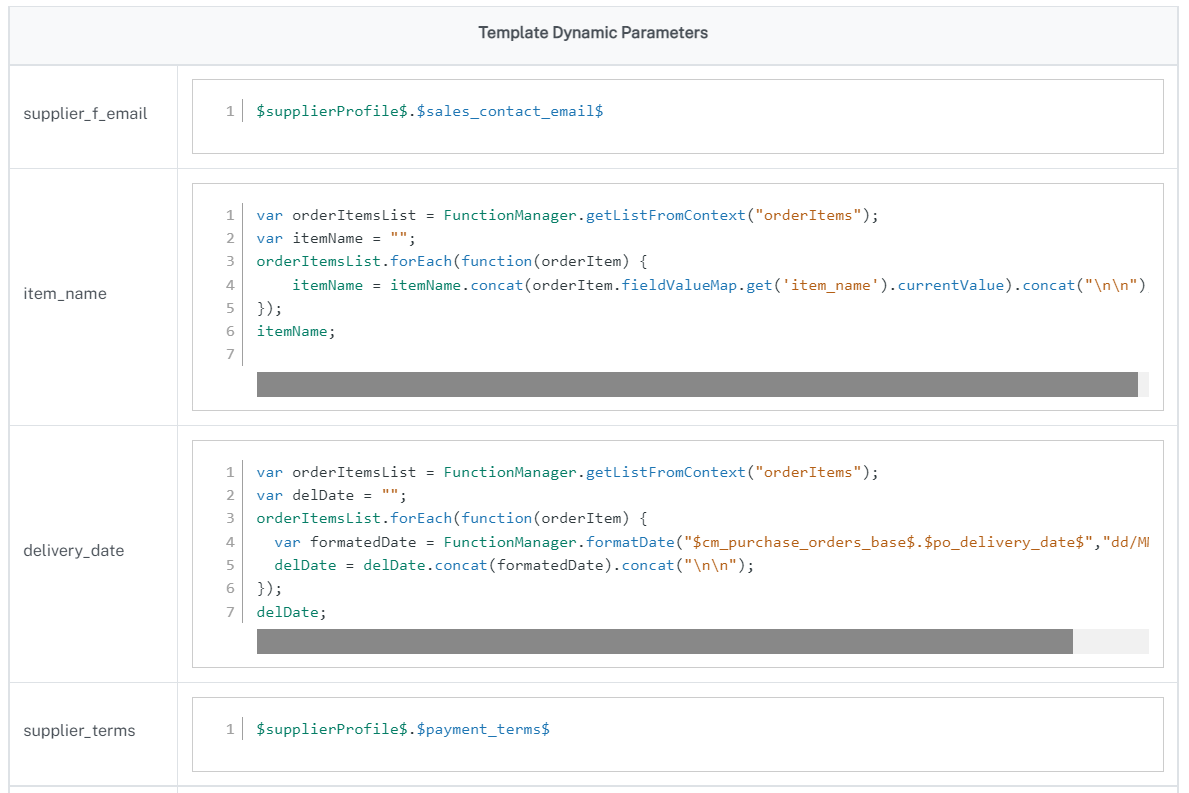
You can use Beezl to dynamically fill the dynamic placeholders.
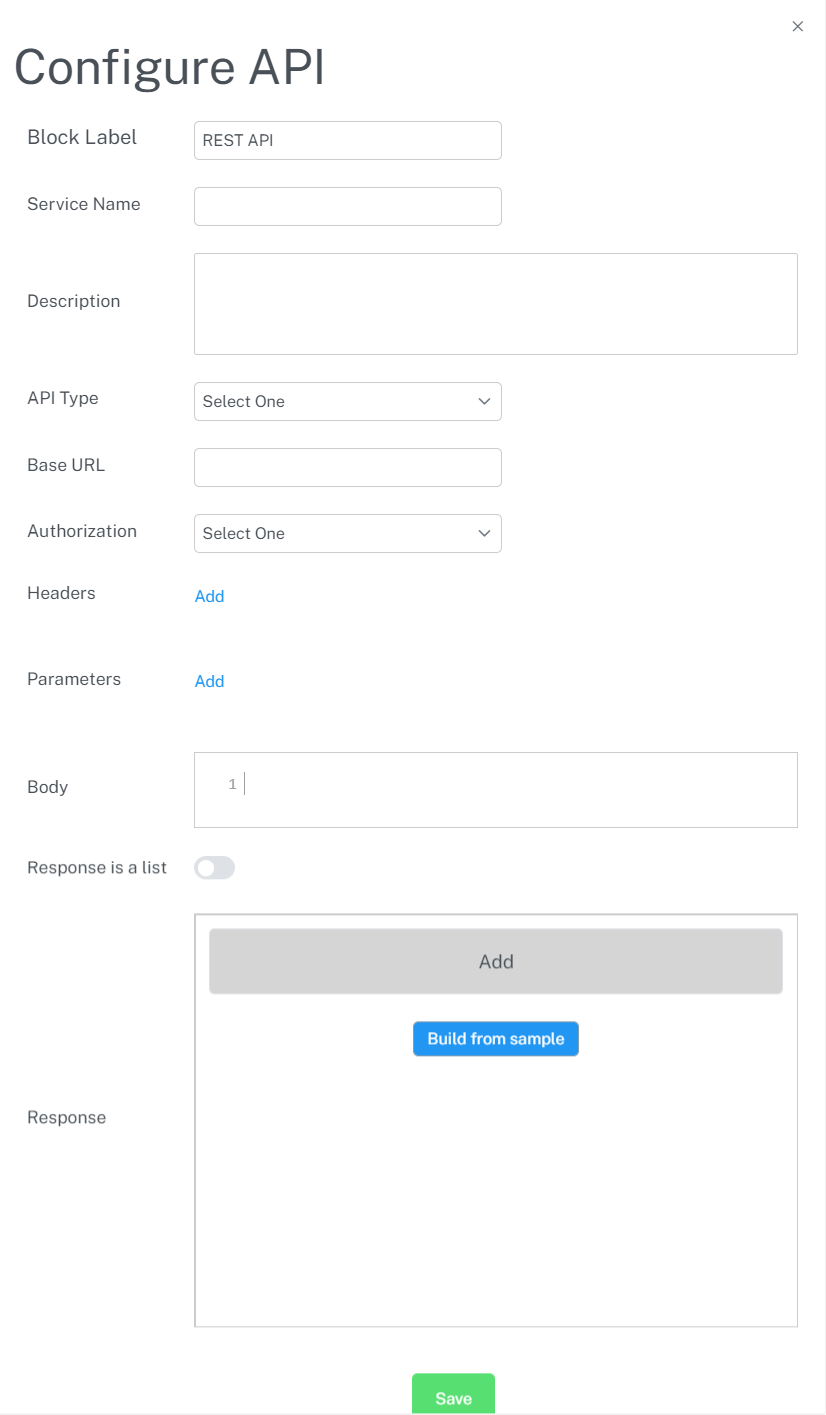
12. REST API
Integrate Beezr with external systems using restful APIs. Drag a "REST API" step into the workspace and click the gear icon to open the configuration.
13. Custom Function
To give you more flexibility and freedom to innovate, you can use the "Custom Function" step to building completely custom functions using Beezl.